


Supplies:
Cardstock (either 12 x 12 or 8 ½ x 11) I used CTMH Level 1 Scrapbook kit pattered cardstock.
Standard size hole punch
Circle punch 5/8 inch (mine is by Fiskars)
1 sticky note pad 3 x 3
Strong adhesive (I used Terrifically Tacky Tape)
Ribbon to match your cardstock
Pen
Embellishments
Cardstock (either 12 x 12 or 8 ½ x 11) I used CTMH Level 1 Scrapbook kit pattered cardstock.
Standard size hole punch
Circle punch 5/8 inch (mine is by Fiskars)
1 sticky note pad 3 x 3
Strong adhesive (I used Terrifically Tacky Tape)
Ribbon to match your cardstock
Pen
Embellishments
Directions:
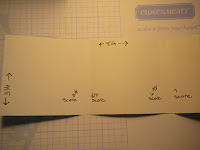
Cut cardstock 8 ¼ by 3 ¼ inches
Score at 3 1/8, 3 ½, 6 5/8, 7
Cut cardstock 8 ¼ by 3 ¼ inches
Score at 3 1/8, 3 ½, 6 5/8, 7


 Create two holes for the ribbon.
One side is longer than the other. On the longer side measure in ¾ of an inch on center and using the regular hole punch make the first hole.
Next, on the short side with 5/8 circle punch measure in ¼ inch on center and punch the second hole.
Cut a 3 inch piece of ribbon for the pen loop.
NOTE: You may need to adjust the length of ribbon based on the pen you intend to use. My pen has a larger barrel with a grip surface that doesn’t slide easily. Test before you secure the ribbon with adhesive.
Fold Ribbon in half and insert loop through the smaller hole. Make sure the ends of the ribbon are on the back side.

Make sure the pen will fit through the loop. Then secure the ribbon with Terrifically Tacky Tape or other strong adhesive.


Next, attach the 3 x 3 note pad with more Terrifically Tacky Tape on the back of the note pad.
Make sure the ribbon is lining up so the pen can be inserted easily. Test it one more time. Make adjustment to the ribbon as necessary.
Now get out the embellishments and make it sparkle and shine.
Now get out the embellishments and make it sparkle and shine.

Here are the books I have made.

If you have questions feel free to e-mail me at bobieglassett@gmail.com or leave a comment/question on this post.
I hope you have as much fun making these little books as I have. Send me photos of your creations or leave me a link to your blog.
Thanks,
Bobie

If you have questions feel free to e-mail me at bobieglassett@gmail.com or leave a comment/question on this post.
I hope you have as much fun making these little books as I have. Send me photos of your creations or leave me a link to your blog.
Thanks,
Bobie
Thanks so much for taking the time to put this tutorial together!!
ReplyDeleteLoved your class today! Can't wait to make a bunch of these as hostess gifts and for my club members.
ReplyDeleteJust watched your recording for the post-it holder you made for CU Online, it is so pretty in the blue colors.
ReplyDeleteAnd what a clever way to close the holder and hold the pen with the ribbon through the large hole.
Hello I am watching your tutorial and I have to say these are very nice and with a pen holder too! How nice!
ReplyDeleteI am now your follower.
Quilled hugs,
Linda K.
Watched you live last night and enjoyed seeing you again. I think you are a great teacher and loved your techniques that you shared with us last night. LOVE these post it note holders! So cute. Enjoyed the CU on Saturday Aug 28th and hope to see you there again.
ReplyDelete