
Saturday, March 21, 2020

Tuesday, January 23, 2018
A Mother's Thoughts
My son, Nick Glassett, has started his own blog called Orign Leadership and I am so proud of him.
This is the boy who once told me that there was no point to reading. (About 16 years old.) He informed me that any good book gets made into a movie and so he could just watch the movie and there was no need to ever read.
 |
| Nick Sophomore Year |
As a teacher and a READING teacher at that, I was speechless. I simply nodded and let it go. No sense arguing with a 16 year old who knows all about the world. I assumed that if reading was pointless writing was also not necessary.
Imagine my surprise when a few years ago Nick started talking about the books he was reading. I didn't let on about his statements from the past and his thoughts on reading. I listened and even bought a few of the books he was reading. I fascinated that he had changed his mind about reading.
In July, Nick decided to start a blog. I was intrigued but cautious. periodically he would send me a link to a post he had written and I was always impressed with his writing. It is clear, concise and entertaining. He makes me so proud! I have always thought he was the brightest, funnest son a mom could have. But now, he is sharing it with the world. The world will see what I have always seen!
 |
| Nick, Boston and Michelle |
So meet my smart, funny, talented, athletic, competitive, son! Click on the Who We Are tab and you can read all about this amazing son of mine, OK, OURS. His Dad had a lot to do with creating this great human!
He is now married to an amazing woman and they have a terrific little boy named Boston. Read his blog by clicking this link or the one above! He is a joy to be around and I can't wait to see what he writes about next!
Sunday, September 24, 2017
Skull Earrings
Skull Earrings


Saturday, September 16, 2017
Purple and Gold Earrings


Monday, February 6, 2017
New Adventure

NEW ADVENTURE ON ETSY
This pair of earrings are for sale! I am now selling my handmade items online at Etsy. My Esty shop is called Bobie'sBaubleBoutique. I am hoping to increase visitors and if you would like to purchase something for yourself, a friend, or family member with no shipping charges use the coupon code NEWFEB.This is a new adventure and one that I have been wanting to begin for quite a while. I realized that the only real way to find out if something is going to work is to TRY! Not an earth shattering realization but one that spurred me into action none the less.
I have been crafting up a storm lately and I will share some of my new projects later this week. It is fun to be talking (typing, in reality) about crafts again. I HAVE MISSED THIS BLOG! I would love to hear about your new adventures so leave me a comment!

Bobie
HERE IS ANOTHER PAIR OF EARRINGS AVAILABLE ON MY ESTY SHOP.
Wednesday, August 20, 2014
DIY Vanity Honey Oak Transformation
.JPG)
I didn't get a photo taken before Mark had the door removed. Here is another piece of the old Honey Oak that was EVERYWHERE in our house when be bought it 1996! It was the height of style in 1985 when the house was built, not so much by 1996, and horribly outdated in 2014! Despite not loving it when we moved in I learned to just live with it.
.JPG)
This was a pretty quick project. Mark took the doors off on Thursday and we put it all back together on Sunday. If you are interested in doing something similar you will need some supplies.
Supplies I used
Palm sander
Sanding pads
Gloves
Tack cloth
Black indoor paint
Paint brushes (one 2 inch and one smaller brush for details and close to walls)
Tarp
The first thing we did was remove the doors and sink panel. I tried to strip them but all the curved surfaces around the trim pieces didn't come clean. I then got out my palm sander and sanded them. I didn't go crazy here just roughed up the varnish.
.JPG)
Next, we sanded the face of the vanity in the bathroom. We hung a piece of tarp up to trap the dust into as small of a space as possible.
Then, I used blue painters tape and taped off the counter and the walls. I wiped off the doors and face of the vanity with a tack cloth. If you have never used a tack cloth before I HIGHLY recommend buying one. I used a wet cloth in the past but it just doesn't work as well.
.JPG)
Next, I painted two coats on the face pieces and two coats on the doors.
Finally, we waited for it to dry and put it all back together.
.JPG)
We had new carpet installed as well and I LOVE how this looks now! The honey oak is gone! This bathroom looks like it belongs in 2014!
Sunday, August 17, 2014
DIY Refinished 1960's Desk
.JPG)
I didn't take a picture before I started but there are two dressers that have the same finish and it was a set purchased for my husband and his brother when they were just little boys.
 .JPG) |
| Add caption |
.JPG) I used a chemical stripper and sanded both the desk and drawers. It was a lot of work since this is an older piece of furniture. In hind sight I wish I had done even more sanding. After three days of working on this my arm and right hand were sore and I had to move on.
I used a chemical stripper and sanded both the desk and drawers. It was a lot of work since this is an older piece of furniture. In hind sight I wish I had done even more sanding. After three days of working on this my arm and right hand were sore and I had to move on. .JPG)

Saturday, August 16, 2014
Upcycled Broken Binder
I upcycled a broken binder today and wonder why it took me 15 years of teaching to think of this! I will never throw away another binder! This is super easy and free. Got to love that!
I have wanted some kind of strudy writing surface for student to use in class. As an AVID teacher last year, I learned a really effective teaching strategy called a Gallery Walk. Student walk around the room looking at different items and complete an assignment. It allows them to get up and walk around while doing an assignment. It was AWESOME with middle school students. One issue I kept running into was when the kids were trying to fill in answers they had no firm writing surface. I considered clipboards but they are so bulky to store! Even five clipboards are too messy for me. PROBLEM SOLVED with the upcycled binder!
All you need is a broken binder (or you could even go to the dollar store and get binders if you wanted several right away) and a pair of scissors.
Cut the front cover and back cover away from the spine.
The binder I used was a view binder so the front has a clear cover on it. This is where I will put instructions for my students. If your cover is just a regular cover use a binder clip to attach instructions. The back side has a pocket. This is where I will place the worksheet.

I have wanted some kind of strudy writing surface for student to use in class. As an AVID teacher last year, I learned a really effective teaching strategy called a Gallery Walk. Student walk around the room looking at different items and complete an assignment. It allows them to get up and walk around while doing an assignment. It was AWESOME with middle school students. One issue I kept running into was when the kids were trying to fill in answers they had no firm writing surface. I considered clipboards but they are so bulky to store! Even five clipboards are too messy for me. PROBLEM SOLVED with the upcycled binder!
All you need is a broken binder (or you could even go to the dollar store and get binders if you wanted several right away) and a pair of scissors.
.JPG) |
| Broken binder |
Cut the front cover and back cover away from the spine.
.JPG) |
| Cut apart binder |
.JPG) |
| View binder cover |
.JPG) |
| Pocket side Now, this isn't just a teacher thing. This could be used at home for all sorts of things. One idea that came to my mind was spelling lists. A parent could label the view side/front side with each child's name and slip in or attach the list for the week. The pocket on the back could hold flash cards and lined paper to practice on during the week. |
Another use could be a menu planner. Write it on a piece of paper slide it into the view side or use a page protector and attach with a binder clip. You could use a dry erase marker to write in the menu too! Attach a command hook and hang the menu anwhere you want! On the pocket side you could keep a shoping list and coupons. Below are two photos of what is hanging in my kitchen.
.JPG) |
| Menu side |
.JPG) |
| List and coupon side |
Give it a try! I would love to see what you create!
Sunday, August 10, 2014
Upcycled Window Blind Trim
 I found an old piece of trim in the basement and upcycled it into
a lesson plan board. I got the idea after seeing a menu planner board on Pinterest that is for sale on Etsy.
I immediately thought it would be a great
lesson plan board.
I found an old piece of trim in the basement and upcycled it into
a lesson plan board. I got the idea after seeing a menu planner board on Pinterest that is for sale on Etsy.
I immediately thought it would be a great
lesson plan board.
I often bury or misplace my lesson plan book in the course
of the day. This year I will be teaching six periods of Reading and I know the same kind of chaos
will plague me! My plan is to write some breif notes about my lesson on these cards. I can take the card off quickly if I need to refer to it during class and it has a specific spot to return it to when I am finished. Students can also look at the board instead of asking me what we are doing in class.
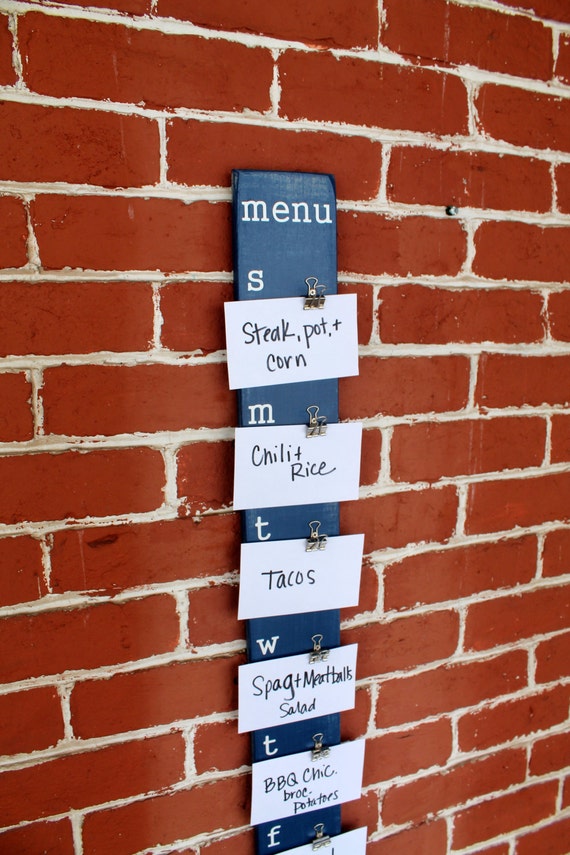 |
| Inspiration for Lesson Plan board |
For this project you will need:
1 board
Alphabet stickers
5 cup hooks
5 Binder Clips
Index Cards
Below is a picture of the piece of trim I used. It fell off the blind and the plastic piece that held it on was broken. Since I have a window topper covering the top part of the blinds I don't care about this piece of trim. I chose it becasue it is already painted and ready to use. Any scrap piece of wood would work. This is just what I had available.
 |
| Window Blind Trim |

 |
| Cup Hooks Added to trim |
After the hools were in place I added the days of the week. I used a really old set of alphabet stickers from my stash. I learned a trick a few years ago from my friend Kathy. Stick the letters onto a piece of plastic before putting them on the project. Place the stickers so about 1/2 of each letter is off the plastic. (I keep blank pieces of plastic from packages of stickers or double sided tape for this purpose.) This allows me to line up the letters and get the placement just right on the project. I then placed the stickers above each cup hook. It isn't perfect but I works for me. I wanted to add some rub-on flowers but I didn't plan out space for that I don't have the space for it. Something to consider if I ever make another one!
Tuesday, July 15, 2014
DIY Jewlery Organizer from a Picture Frame

I needed this jewlery organizer
a long time ago!
Usually my earrings are a big ol' mess all over my dressser. My husband complains about the cluttered look and it has been impossible to dust.I used an old picture frame, eyelet, white cup hooks, and thumb tacks to make this wonderful organier.The frame is pretty big because I make jewery and so does my Mom and sisters. I have a lot of earrings.
I have seen several DIY organizers on Pintrest and my Daughter-in-law makes a hair accsesory organizer. Picture frames are the common denominator in all the organizers. Many have screen or wires to hang the jewlery from. I have found that my earrings tarnish very quickly when in contact with metal. I was thinking I would use thin ribbon. Then I had a brillant idea. EYELET! That was it. I jumped out of bed got dressed and ran downstrirs and dug out all my old pictures.
(This room is going to get new paint and new carpet by August 5th. This is all part of a larger makeover for the bedrooms in our house. More on that later.) Below is a list of supplies used and some instructions.
 Supplies
Picture frame
Pliers
butter knife
Eyelet or lace
Thumb tacks
Cup Hooks
This is my old picture stash. Quite a collection! I wasn't sure which frame I wanted so I pulled all the pictures apart and then selected the biggest one! Not too suprising.


Most picture frames look like the one below. Bend the prongs up that hold the back and glass in. Throw the back and glass away or, if you are like me, keep both for some unknown project in the future. I believe there is a name for this I call it recycling, my husband calls it horading!
Once you have selected a frame. Get out your eyelet or lace. I actually used some of both. Again, I just went to my sewing room and got out a baggie full of lace and eyelet. Most is from making baby blankets for my boys. My baby will turn 26 in September. I am telling you I never throw anything away!
Next, I measured and cut the lace and eyelet. I didn't get very precise on measurements. I started in about the middle and added one row about two inches above the middle row and another two inches below the middle. I continued like that until I got to the top.
Finally, I added te earrings and quickly discovered that the lace and eyelet needed to be much tighter. I took off all the earrings and adjusted all the rows. My suggestion is to pull them really tight from the begining. I would also suggest using 100% cotton eyelet. Polyester stretches a lot. If you look in the picture you can see some droopy rows, they are polyester. I MIGHT replace them. So far it hasn't bothered me. Sometimes things like that irritate me, but this doesn't seem to at this point.
The last thing is to hang up your frame. As I mentioned this room is going to get painted and so Mark refused to hang my organizier up properly. I don't blame him. no sense doing something twice.
I am going to make a smaller version of this for the night stand. I seem to crawl into bed with earrings on a lot. Once, a long time ago, a diamond earring fell in the garbage can next to my bed. I didn't realize it until after the garbage was taken out and the city picked up the trash! I cried for a long time that day!
A unexpected result of this new organizer, I found so many lost earrings. I had about six or seven different little cups and containers for my earrings before the organizer. As I emplied each container and hung up the earrings I found lots of misplaced earrings. Good thing I never throw anything away. See, it is good to recycle.
Friday, July 4, 2014
Patriotic Centerpiece repeat
 |
| Fourth of July Centerpiece |
Items listed below are from Close To My Heart.
Inks: Tulip, Moonstruck and Indian Corn Blue.
Card stock: White Daisy, Outdoor Denim, and Tulip.
Stamp Sets: Adorable, In The Month Of July, A Twinkle, Calendar, Save The Date, Classmates Alphabet, and It's A Party.
Ribbon: Tulip and Outdoor Denim.
Other items: Bamboo Skewers, white ribbon and eyelets, bucket, candy, cicrle punch, star punch.
 |
| Thanksgiving Centerpiece |
DIY Wax Paper Transfer
 |
| The sign I made |

The Wax Paper method seemed like the easiest for me.
You need the following items:
Wax paper
Scissors
Printer
Computer
Wood, fabric or other surface
A rubbing tool like a popcycle stick or spoon.
Spray bottle for misting the wood
Basically, I cut a piece of wax paper to
8 1/2 x 11 inches and fed it into my Lexmark 4650 printer.
Next, I lightly misted a section of 1 by 10 inch piece of pine board. I then laid the wax paper ink side down, onto the board. Then, I rubbed the wax paper with a popcycle stick.
VIOLA! The ink went onto the wood and I have a new sign!
Mark has a router bit called a keyhole bit. He is going to use it to create a keyhole on the back of the piece of wood as a way to hang my sign.
I think the plain wood is a little boring so I am going to experiment with white wash for the next attempt. I also want to somehow "ink" the edges to age the sign.
If you have been wondering about making a DIY sign I found it to be super easy once you have a piece of wood.
In the future, after I perfect the wooden sign, I want to try placemats and maybe a burlap pillow.
 |
| The mirrored image I downloaded from The Graphics Fairy |
Thursday, July 3, 2014
Harley Trip Smash Book

I was really worried that Mark would flip out about traveling with scrapbooking supplies on a Harley trip. SURPRISE! He didn't even care! WHEW.
Each morning and evening I would spend a few minutes writing about the days events. Mostly what roads we took and where we ate. Ride to eat is our motto! I am really proud of myself. The trip is well documented and I had fun doing it on the road.
The second day of the trip I strted collecting pamplets and brochures about the towns we were in I really like this page!


On this page is a photo I took while on the trip. I got a map of Idaho and collected some sticks and a cat tail and laid it all on the floor of our hotel room and took the picture. I printed it out when we got home. This last page is near the end. I had our friends take a piture of my husband and I at dinner on our last night. Again, I printed the pitures after we got home. I added in some missing details after we got home too.

We are going on one more Harley vacation and I plan to take my new little Smash book and supplies again. It is fun and easy and mostly done when I get home. How about you? Are you Smashbooking yet?
Wednesday, July 2, 2014
Smash book

I went looking through my craft stash and I have a few blank journals that will become smash books. I noticed that Close To My Heart has a blank journal they call a Crush Book. I beleieve it is the same idea. Since I am no longer a consultant I am not positive.
Below is my first Smash book.There are also some photos of my pages. As you can see it is random scrapbookking! No rules, just pure fun! I am not sure why this is so much fun but, it really is! I have seen lots of different kinds of blank books being used. Something as simple as a wire bound notebook to a fancy book made just for smashing. I will show you some of my other Smash books later this week. Have you been Smashing anything? I highly recommend it!


Subscribe to:
Posts (Atom)