Welcome

I love to create handmade gifts for every occasion. Look around and leave me a comment or two. I love comments!

Translate

Wednesday, August 20, 2014

DIY Vanity Honey Oak Transformation

I DIYed the vanity in Mark's bathroom and transformed from Honey Oak Yuck into something Dark and Wonderful! We tore out all our old oak cabinets in the kitchen a few years ago but this vanity didn't make it into the remodel budget. It has been on my summer list of things to do ever since.

I didn't get a photo taken before Mark had the door removed. Here is another piece of the old Honey Oak that was EVERYWHERE in our house when be bought it 1996! It was the height of style in 1985 when the house was built, not so much by 1996, and horribly outdated in 2014!  Despite not loving it when we moved in  I learned to just live with it.
This was a pretty quick project. Mark took the doors off on Thursday and we put it all back together on Sunday. If you are interested in doing something similar you will need some supplies.

Supplies I used
Palm sander
Sanding pads
Gloves
Tack cloth
Black indoor paint 
Paint brushes (one 2 inch and one smaller brush for details and close to walls)
Tarp

The first thing we did was remove the doors and sink panel. I tried to strip them but all the curved surfaces around the trim pieces didn't come clean. I then got out my palm sander and sanded them. I didn't go crazy here just roughed up the varnish. 
Next, we sanded the face of the vanity in the bathroom. We hung a piece of tarp up to trap the dust into as small of a space as possible. 
Then, I used blue painters tape and taped off the counter and the walls. I wiped off the doors and face of the vanity with a tack cloth. If you have never used a tack cloth before I HIGHLY recommend buying one. I used a wet cloth in the past but it just doesn't work as well. 

Next, I painted two coats on the face pieces and two coats on the doors. 
Finally, we waited for it to dry and put it all back together. 

We had new carpet installed as well and I LOVE how this looks now! The honey oak is gone! This bathroom looks like it belongs in 2014! 

Sunday, August 17, 2014

DIY Refinished 1960's Desk

I refinished a desk that belonged to the Glassett family sine the early 1960's. I truly did this on my own or DIY! It is very stressful refinishing furiture that belonged to the in-laws! I am happy with the results but learned a lot, as usual, along the way.

I didn't take a picture before I started but there are two dressers that have the same finish and it was a set purchased for my husband and his brother when they were just little boys.
Add caption
I used a chemical stripper and sanded both the desk and drawers. It was a lot of work since this is an older piece of furniture. In hind sight I wish I had done even more sanding. After three days of working on this my arm and right hand were sore and I had to move on. 
I stained the whole thing three different times and could have done one more. I was out of energy for this project and varnished it. I filled in the holes where the original hardware was but I am NOT happy with the way the stain took on those spots. Still can't decide what to do. I am using the desk now without and handles or drawer pullls. Such is the life of a DIY'er!


Saturday, August 16, 2014

Upcycled Broken Binder

I upcycled a broken binder today and wonder why it took me 15 years of teaching to think of this! I will never throw away another binder! This is super easy and free. Got to love that!

I have wanted some kind of strudy writing surface for student to use in class. As an AVID teacher last year, I learned a really effective teaching strategy called a Gallery Walk. Student walk around the room looking at different items and complete an assignment. It allows them to get up and walk around while doing an assignment. It was AWESOME with middle school students. One issue I kept running into was when the kids were trying to fill in answers they had no firm writing surface. I considered clipboards but they are so bulky to store! Even five clipboards are too messy for me. PROBLEM SOLVED with the upcycled binder!

All you need is a broken binder (or you could even go to the dollar store and get binders if you wanted several right away) and a pair of scissors.
Broken binder


Cut the front cover and back cover away from the spine. 

Cut apart binder
The binder I used was a view binder so the front has a clear cover on it.  This is where I will put instructions for my students. If your cover is just a regular cover use a binder clip to attach instructions. The back side has a pocket. This is where I will place the worksheet. 

View binder cover 
Pocket side
Now, this isn't just a teacher thing. This could be used at home for all sorts of things. One idea that came to my mind was spelling lists. A parent could label the view side/front side with each child's name and slip in or attach the list for the week. The pocket on the back could hold flash cards and lined paper to practice on during the week. 
Another use could be a menu planner. Write it on a piece of paper slide it into the view side or use a page protector and attach with a binder clip. You could use a dry erase marker to write in the menu too!  Attach a command hook and hang the menu anwhere you want! On the pocket side you could keep a shoping list and coupons. Below are two photos of what is hanging in my kitchen. 
Menu side
List and coupon side

Give it a try! I would love to see what you create! 


Sunday, August 10, 2014

Upcycled Window Blind Trim

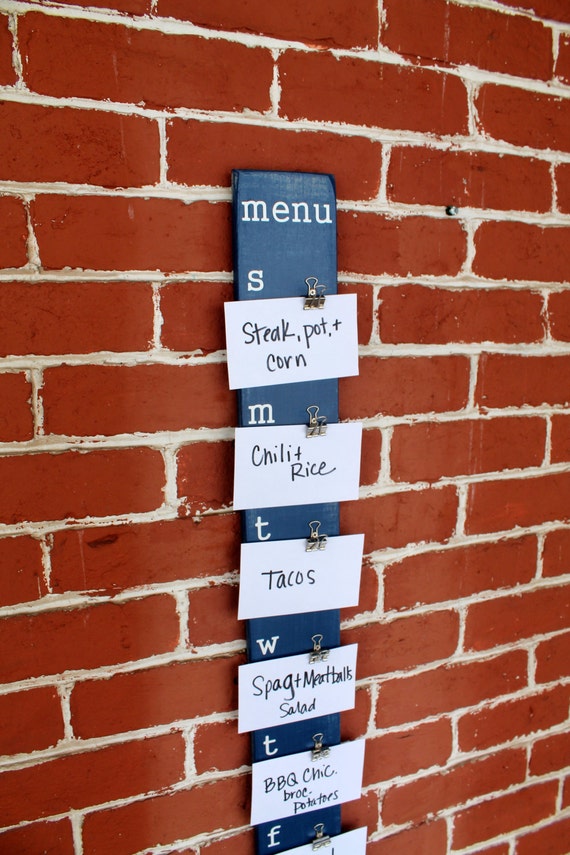
I found an old piece of trim in the basement and upcycled it into a lesson plan board. I got the idea after seeing a menu planner board on Pinterest that is for sale on Etsy.  I immediately thought it would be a great lesson plan board.
I often bury or misplace my lesson plan book in the course of the day. This year I will be teaching six periods of  Reading and I know the same kind of chaos will plague me! My plan is to write some breif notes about my lesson on these cards. I can take the card off quickly if I need to refer to it during class and it has a specific spot to return it to when I am finished. Students can also look at the board instead of asking me what we are doing in class. 

Menu Board - 3.75" x 36.5" - Made to Order Meal Planner
Inspiration for Lesson Plan board
For this project you will need:
1 board
Alphabet stickers
5 cup hooks
5 Binder Clips
Index Cards


Below is a picture of the piece of trim I used. It fell off the blind and the plastic piece that held it on was broken. Since I have a window topper covering the top part of the blinds I don't care about this piece of trim. I chose it becasue it is already painted and ready to use. Any scrap piece of wood would work. This is just what I had available. 
Window Blind Trim 


Cup Hooks Added to trim
 Once I had my board I needed to figure out  where I wanted the hooks placed. Mark helped me with this because math is not my strong suit. He pre-drilled the holes to prevent the wood from splitting. It takes a few extra minutes but it is worth it. This trim is really thin and I was sure it would crack if the holes were not pre drilled.

After the hools were in place I added the days of the week. I used a really old set of alphabet stickers from my stash. I learned a trick a few years ago from my friend Kathy. Stick the letters onto a piece of plastic before putting them on the project. Place the stickers so about 1/2 of each letter is off the plastic. (I keep blank pieces of plastic from packages of stickers or double sided tape for this purpose.) This allows me to line up the letters and get the placement just right on the project. I then placed the stickers above each cup hook. It isn't perfect but I works for me. I wanted to add some rub-on flowers but I didn't plan out space for that I don't have the space for it. Something to consider if I ever make another one!